Raspberry Pirate Radio
Using a Raspberry Pi and a plain 10-20 cm wire with the ability to be connected to an individual GPIO pin as an antenna, it’s possible to transmit radio at a distance of up to 50m or so depending on several factors, including whether or not local interference is causing feedback, or the conductive attributes of the transmitting wire. In my case, a single unsoldered breadboard jumper cable was used as an antenna.

Subprocess.Popen, the module sending and receiving data from the terminal to python, turns out to have a limitation with regards to splitting and dividing work amongst several pins and, once a process has begun, it tends to lock up any parent processes until it is complete. As this was being used to send a signal to the Pi to start the radio transmission, it would freeze the parent window until the audio had completed. With some extra tweaking, this could be fixed with the use of a multiprocessing python module so as to split the process evenly into multiple threads and output them via multiple pins for quicker response times and the ability to runs processes without locking the parent window.
This can be used for a variety of purposes. For example, you could transmit encrypted messages across radio waves, block actual radio stations locally and replace their broadcasts with your own, or simply use it to send audio to different radio enabled speakers around your household.
By using PiFM, Youtube-dl, and ffmpeg, it is possible to download and broadcast youtube audio to whatever radio frequency you would like. This post is just a quick introduction to using a Raspberry Pi as your own personal radio transmitter.
By using PiFM, Youtube-dl, and ffmpeg, it is possible to download and broadcast youtube audio to whatever radio frequency you would like. This post is just a quick introduction to using a Raspberry Pi as your own personal radio transmitter.
PiFM is the library used to transmit an audio file through the 4th GPIO pin of the Raspberry Pi. PiFM can be downloaded using the following commands:
wget http://omattos.com/pifm.tar.gz
tar zxvf pifm.tar.gz
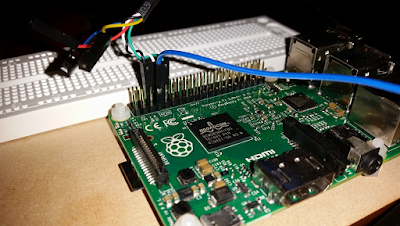
For reference, the blue cable is a breadboard jumper cable plugged into the 4th GPIO pin which is used as an antenna. It doesn't need to be connected to anything else, it is only expanding the range of the audio transmission. Signal strength is relative to the size and conductivity of the antenna, so essentially the larger the antenna, the higher range and clarity is available. Ignore the other cables, they aren't important for this.

Youtube-dl was used to download videos from youtube onto the Raspberry Pi. Youtube-dl is a small command line program that is capable of downloading video content from youtube. The python interpreter it requires are version 2.6, 2.7 or 3.2+, and it can be modified by anyone as it is released to the public domain.
ffmpeg should also be installed to the Raspberry Pi to enable the conversion of youtube videos to an audio format that is able to be used by PiFM for transmission.
The command format for PiFM is “./pifm [AUDIO FILE] [FREQUENCY]”, where [AUDIO FILE] is the name of the file and [FREQUENCY] can be any legal frequency.
While it would be sufficient to just use PiFM's commands in the terminal to transmit some audio file, it's a better option to make a graphical user interface for ease of use. I used Python’s Tkinter library to implement a very simple cross platform graphical user interface to pipe the PiFM commands to the terminal. This GUI has 3 buttons (download, broadcast, and kill feed) along with an entry box so the user can enter the youtube URL they wish to broadcast.

Subprocess.Popen, the module sending and receiving data from the terminal to python, turns out to have a limitation with regards to splitting and dividing work amongst several pins and, once a process has begun, it tends to lock up any parent processes until it is complete. As this was being used to send a signal to the Pi to start the radio transmission, it would freeze the parent window until the audio had completed. With some extra tweaking, this could be fixed with the use of a multiprocessing python module so as to split the process evenly into multiple threads and output them via multiple pins for quicker response times and the ability to runs processes without locking the parent window.
One way of fixing this signal leak and killing the process before the audio is finished was to create an executable shell script (which i called kill.sh) to automatically run the manual fix necessary to kill all GPIO signal outputs and reset them to their original state like so:
nano kill.sh
#paste the following
import RPi.GPIO as GPIO
GPIO.setmode(GPIO.BOARD)
GPIO.setwarnings(False)
GPIO.setup(7, 0)
GPIO.cleanup()
sudo chmod -x kill.sh #allowing the file to be executed via terminal
Once this fix is implemented, you can simply reset leaked signals by typing “sudo kill.sh” into the terminal. Or as you might have guessed, access and run the kill.sh file through the python GUI, like i did. This implementation is by no means perfect, and if you do decide to use the GUI example in the image above, it won't work without writing the kill.py file to run the shell script, kill.sh. Honestly, you're better off making your own GUI. I just made this so i wouldn't have to keep typing the commands all the time.
There, that's it.
Once the GUI is run, the user will be able to enter a valid youtube URL of their choice, and click the download button. I couldn't be bothered implementing a loading bar, so the user will need to wait a moment for the youtube video to finish downloading, at which point he can click on the broadcast button, and the audio from the Youtube video will be broadcast to the specified FM frequency, looking at the code above, it is 89.9 FM.
BE CAREFUL WITH THIS. The idea is to choose a frequency which is not in already used by local or national radio stations, because they will likely drown out your broadcast with their much stronger transmission signal. With the raspberry Pi only costing around $40 and the cost of a jumper cable being negligible, for what it’s worth, they are a nice cheap alternative to some of the specialised radio transmission hardware. Unfortunately for the creative individuals who see this as an opportunity to broadcast their own local radio station, broadcasting over a certain range is illegal in most countries without a permit and perpetrators can wind up with fines in the hundreds of thousands of dollars if accidentally penetrating a government regulated frequency. Although a fine is not mentioned, one such case occurred in August/September 2011: 105.7 MHz was heard publicly broadcasting in the Bendigo region of Victoria, Australia, at around 40 Watts and playing predominately dance music. The station was closed by the Australian Communications and Media Authority, and the music enthusiast’s equipment was consequently seized.
It's useful to know if there are any odd signals within your local area, they are probably being transmitted from a short distance away.


Comments
Post a Comment